LS swap wiring is the most complex aspect of modern engine swaps‚ requiring precise connections and a deep understanding of automotive electrical systems to ensure reliability․
Overview of LS Swap Wiring Complexity
LS swap wiring is renowned for its complexity‚ often intimidating even experienced builders․ The process involves intricate electrical systems‚ requiring precise connections to ensure functionality․ Unlike mechanical swaps‚ wiring demands a deep understanding of automotive electronics‚ with the LS engine’s advanced systems adding layers of complexity․ Custom wiring harnesses and ECU configurations are critical‚ as modern engines rely heavily on electronic communication․ Missteps‚ such as incorrect wire connections or ECU settings‚ can lead to costly delays or system failures․ This complexity makes wiring the most challenging aspect of an LS swap‚ necessitating patience‚ detailed planning‚ and often professional guidance to achieve a reliable setup․
Importance of Proper Wiring in LS Swaps
Proper wiring is critical in LS swaps to ensure the engine and vehicle systems function seamlessly․ Incorrect or poorly executed wiring can lead to catastrophic issues‚ such as engine failure‚ electrical fires‚ or unsafe operating conditions․ The LS engine relies heavily on its electronic systems‚ including the ECU‚ sensors‚ and actuators‚ which must communicate accurately․ Without a well-planned and precisely installed wiring harness‚ these components cannot synchronize‚ leading to poor performance or complete system failure․ Additionally‚ proper wiring ensures compatibility between the LS engine and the host vehicle’s electrical infrastructure‚ making it essential for both reliability and safety․ Attention to detail is paramount to avoid costly repairs and ensure a successful swap․

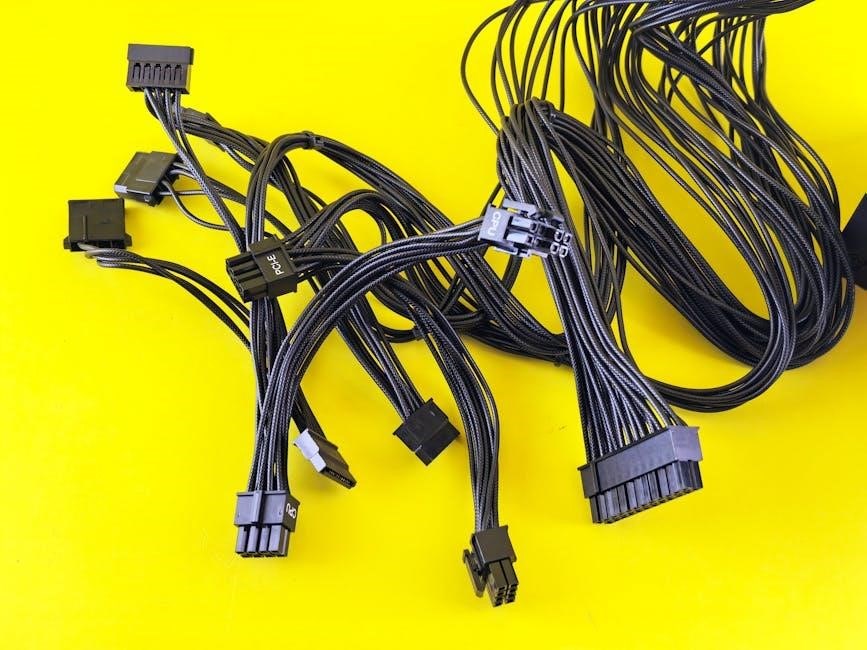
Understanding the LS Engine and Wiring Harness
The LS engine is a modern V8 known for its power and efficiency․ The wiring harness connects critical components‚ ensuring proper communication and engine operation․
LS Engine Basics and Electrical System Overview
The LS engine is a family of General Motors V8 engines known for their lightweight‚ high power output‚ and advanced technology․ The electrical system relies on a sophisticated wiring harness to manage functions like fuel injection‚ ignition timing‚ and emissions control․ Sensors throughout the engine provide data to the Engine Control Module (ECM)‚ which processes information to optimize performance․ The system also includes components like the Mass Airflow Sensor‚ throttle position sensor‚ and crankshaft position sensor‚ all critical for proper engine operation․ Understanding these basics is essential for successfully wiring an LS swap․
LS Wiring Harness Components and Functions
The LS wiring harness is a complex network of wires and connectors designed to manage the engine’s electrical systems․ It includes the Engine Control Module (ECM)‚ which acts as the brain‚ processing data from sensors like the Mass Airflow Sensor (MAF)‚ Throttle Position Sensor (TPS)‚ and Crankshaft Position Sensor (CKP)․ These sensors provide critical information for fuel injection‚ ignition timing‚ and emission control․ The harness also connects to fuel injectors‚ ignition coils‚ and other essential components․ Proper routing and connections are vital to ensure reliable communication between the ECM and all subsystems․ While modifying the stock harness is possible‚ it requires careful planning and often professional tools to avoid system malfunctions․

Planning Your LS Swap Wiring Project
Planning an LS swap involves thorough research‚ assessing vehicle compatibility‚ gathering necessary tools‚ and understanding the electrical system to ensure a smooth and successful installation process․
Assessing Vehicle Compatibility for LS Swap
Assessing vehicle compatibility is crucial for a successful LS swap․ Ensure the engine fits physically and aligns with the transmission and chassis․ Check the electrical system’s compatibility with the LS engine’s wiring harness․ Verify if the vehicle’s ECU can communicate with the LS engine or if a standalone ECU is needed․ Also‚ consider the fuel system‚ as high-pressure fuel injectors may require upgrades․ Compatibility issues can lead to costly modifications‚ so thorough research and planning are essential to avoid surprises during the swap process․
Gathering Necessary Tools and Materials
To tackle an LS swap wiring project‚ gather essential tools and materials․ Start with a detailed wiring diagram specific to your LS engine and vehicle combination․ Invest in a multimeter for troubleshooting and a set of wiring tools‚ including crimpers‚ strippers‚ and heat-shrink tubing․ A good ECU programmer‚ such as HPTuners‚ is crucial for configuring the engine’s computer․ Stock up on high-quality connectors‚ relays‚ and wiring supplies to ensure reliable connections․ Don’t forget a tuner-compatible ECU and adapters for integrating modern systems․ Having spare wiring and components on hand can save time and prevent delays during the swap process․
Preparing the LS Wiring Harness
Modify the stock wiring harness to suit your vehicle‚ ensuring proper connections for engine operation․ Consider using a standalone ECU to simplify the wiring process and ensure reliability․
Modifying the Stock Wiring Harness
Modifying the stock wiring harness is a critical step in an LS swap․ Begin by carefully analyzing the harness to identify unnecessary wires‚ ensuring only essential connections remain․ This process often involves repinning connectors to match your vehicle’s electrical system․ Proper labeling and organization of wires are crucial for clarity and reliability․ Consider integrating a standalone ECU to simplify the wiring process‚ as it eliminates the need for complex factory systems․ Additionally‚ ensure all connections are secure and compatible with your vehicle’s components․ Testing each connection before final installation is essential to avoid future issues․ This step requires patience and attention to detail to ensure a seamless integration of the LS engine into your vehicle․
Using a Standalone ECU for Simplified Wiring
Utilizing a standalone ECU is a popular approach to simplify LS swap wiring․ It eliminates the need for the factory wiring harness‚ allowing for a cleaner and more straightforward installation․ Standalone ECUs‚ such as the Holley Terminator or HP Tuners‚ are pre-configured to manage essential engine functions like fuel injection‚ ignition timing‚ and sensor inputs․ These systems often include user-friendly software for tuning‚ making it easier to customize engine performance․ By bypassing the complexity of the stock ECU‚ you reduce wiring complexity and potential for errors․ This method is ideal for those seeking a modern‚ reliable setup without the hassle of reworking the factory electrical system․

Installation Guide for LS Swap Wiring
Connect the engine wiring harness to the vehicle’s electrical system‚ ensuring proper integration of the ECU and sensor inputs․ Follow detailed diagrams to hook up dash gauges and accessories․
Connecting the Engine Wiring to the Vehicle
Connecting the engine wiring to the vehicle requires meticulous attention to detail․ Start by identifying the key components of the LS engine harness‚ such as the ECU‚ sensors‚ and power supply wires․ Ensure all connections are compatible with the vehicle’s electrical system․ Use a wiring diagram specific to your setup to map out each connection․ Begin with the battery and ignition wires‚ then move to fuel injectors‚ oxygen sensors‚ and coolant temperature sensors․ Verify each connection for proper function before powering up the system․ This step is critical to avoid electrical issues and ensure smooth engine operation․
Integrating the ECU with the Vehicle’s Electrical System
Integrating the ECU with the vehicle’s electrical system is a critical step in the LS swap process․ The ECU acts as the brain of the engine‚ controlling fuel injection‚ ignition timing‚ and sensor inputs․ Begin by installing the ECU in a secure‚ dry location‚ ensuring proper ground and power connections․ Connect the ECU to the engine sensors‚ such as the crankshaft and camshaft position sensors‚ coolant temperature sensor‚ and oxygen sensor․ Use tuning software like HP Tuners to configure the ECU for your specific setup․ Proper communication between the ECU and the vehicle’s electrical system is essential for smooth engine operation and performance optimization․
Hooking Up Dash Gauges and Accessories
Hooking up dash gauges and accessories is essential for monitoring your LS engine’s performance․ Start by connecting the tachometer to the crankshaft position sensor and the speedometer to the vehicle’s speed sensor․ The fuel gauge should link to the fuel level sensor in the tank․ Oxygen sensor and coolant temperature gauges also need proper connections․ Use wiring diagrams to ensure correct pin assignments․ Adapters may be required for compatibility with the LS engine․ Test all connections to avoid faulty readings․ Proper installation ensures accurate data display‚ enhancing your driving experience and helping you maintain engine health․ This step completes the integration of your LS swap’s electrical system․

Common Issues and Troubleshooting
Common issues include wiring complexity‚ faulty connections‚ and ECU communication errors․ Always refer to detailed wiring diagrams and test connections thoroughly to avoid costly rework and ensure reliability․
Diagnosing and Fixing Wiring-Related Problems
Wiring issues in LS swaps often stem from faulty connections‚ open circuits‚ or misconfigured ECU settings․ Start by identifying symptoms like engine misfires‚ dashboard warnings‚ or no-start conditions; Use a multimeter to test voltage and continuity across critical connections‚ ensuring all wires are securely plugged in and free from damage․ Consult wiring diagrams to verify pin configurations and harness routing․ Common problems include incorrect ECU communication‚ reverse polarity‚ or corroded connectors․ Addressing these issues requires patience‚ attention to detail‚ and a systematic approach to eliminate variables․ Always test one connection at a time to avoid overwhelming the system․
Resolving ECU Communication Errors
ECU communication errors in LS swaps often arise from wiring harness issues‚ incorrect pin configurations‚ or firmware incompatibility․ Begin by verifying all connections between the ECU and engine sensors‚ ensuring proper grounding and power supply․ Check for loose or corroded pins‚ as these can disrupt communication․ Consult wiring diagrams to confirm correct pin assignments and verify that the ECU is properly configured for your specific engine and vehicle setup․ If issues persist‚ update the ECU firmware or reflash it using tuning software like TunerStudio or HP Tuners․ Finally‚ test the system incrementally to isolate and resolve any remaining communication faults․
Tools and Resources for LS Swap Wiring
Essential tools include wiring diagrams‚ multimeters‚ and ECU tuning software․ Resources like detailed guides and forums provide step-by-step instructions and troubleshooting tips for a successful swap․
Essential Tools for Wiring Work
A multimeter is crucial for diagnosing electrical issues‚ while wiring diagrams provide a clear map of connections․ Crimpers and heat shrink are necessary for secure‚ weatherproof connections․ ECU tuning software like HP Tuners ensures proper engine communication․ Relays‚ fuses‚ and high-quality wiring harnesses prevent electrical failures․ A well-lit workspace and organized tools simplify the process․ Standalone ECUs‚ such as Holley Terminator‚ streamline wiring by reducing complexity․ Adapter harnesses and connectors are vital for integrating the LS engine with the vehicle’s systems․ Detailed guides and online forums offer troubleshooting tips and step-by-step instructions‚ making the wiring process manageable even for beginners․
Recommended Wiring Diagrams and Guides
Accurate wiring diagrams are essential for a successful LS swap․ Look for detailed ECU pinout charts and vehicle-specific harness diagrams to ensure proper connections․ Manufacturer-provided guides‚ such as GM’s wiring manuals‚ offer precise instructions․ Online forums and community resources often share proven diagrams tailored to specific vehicle-engine combinations; Step-by-step tutorials and video guides can simplify complex wiring tasks․ Additionally‚ consult wiring harness installation guides for tips on integrating modern electrical systems․ Always cross-reference multiple sources to verify connections and avoid errors․ Utilizing these resources ensures a smooth and reliable wiring process for your LS swap project․
Using Tuning Software for ECU Configuration
Tuning software is crucial for configuring the ECU in an LS swap․ Programs like HP Tuners allow customization of engine parameters‚ ensuring optimal performance and compatibility with your vehicle․ These tools enable adjustments to fuel injection‚ ignition timing‚ and sensor calibrations․ By refining the ECU settings‚ you can maximize power output and efficiency․ Software guides often provide step-by-step instructions‚ making it easier to navigate complex configurations․ Regular updates and community support ensure you stay informed about the latest tuning strategies․ Proper ECU configuration is vital for a seamless integration of the LS engine into your vehicle’s electrical system‚ guaranteeing reliability and peak performance․

Cost and Time Considerations
LS swap wiring costs vary based on components‚ tools‚ and labor․ Time requirements depend on project complexity and expertise‚ often spanning several months for a beginner․
Estimating the Cost of Wiring Components
Estimating wiring component costs for an LS swap requires careful planning․ A stock harness modification can cost between $500 and $1‚500‚ while a custom harness may range from $1‚000 to $2‚500․ Standalone ECUs‚ like the Holley Terminator‚ can add $1‚000 to $2‚000‚ depending on features․ Additional expenses include connectors‚ wiring‚ and tools․ Budget at least $500 for basic tools and materials․ Costs rise with complexity‚ such as adding modern electrical systems or custom wiring solutions․ Plan for optional expenses like tuning software or professional assistance․ Total costs typically range from $1‚500 to $4‚000‚ depending on your project’s scope and desired functionality․
Time Management for a Successful Swap

Time management is crucial for a successful LS swap wiring project․ Plan for at least 40-60 hours for a basic setup‚ rising to 100+ hours for complex modifications․ Break the project into stages: harness preparation‚ ECU setup‚ and system integration․ Allocate time for troubleshooting electrical issues‚ which can be unpredictable․ Consider deadlines and your availability to avoid rush decisions․ experienced builders suggest dedicating weekends or vacation time for uninterrupted progress․ novice builders should double the estimated time to account for learning curves․ Staying organized and methodical ensures a smoother process and reduces frustration․ A well-planned timeline helps maintain momentum and achieves a reliable‚ long-lasting result․

Advanced Topics in LS Swap Wiring
Advanced LS swap wiring involves custom harnesses‚ standalone ECUs‚ and integrating modern electrical systems for enhanced performance and control‚ offering superior flexibility and efficiency․
Custom Wiring Harness Options
Custom wiring harnesses offer tailored solutions for LS swaps‚ providing improved reliability and simplified installation․ They eliminate unnecessary components‚ reducing clutter and potential failure points․ A custom harness allows for precise routing and connections‚ ensuring optimal performance and easier troubleshooting; Builders can choose materials and configurations that meet specific needs‚ such as high-temperature rated wires or additional circuits for accessories․ While more labor-intensive‚ a custom harness delivers a clean‚ professional appearance and enhances long-term durability․ Tools like wiring diagrams and soldering equipment are essential for creating a custom harness․ Despite the complexity‚ the benefits of a bespoke setup make it a popular choice for enthusiasts seeking ultimate control over their LS swap project․
Upgrading to Modern Electrical Systems
Upgrading to modern electrical systems enhances the performance and reliability of LS swaps․ Integrating advanced components like CAN bus communication and programmable ECUs allows for seamless integration with newer vehicle technologies; Modern systems offer improved diagnostics‚ real-time monitoring‚ and the ability to support advanced features such as traction control and stability systems․ Builders can utilize high-efficiency alternators and power management systems to optimize battery life and reduce electrical strain․ Additionally‚ modern wiring materials‚ such as heat-resistant and abrasion-proof insulation‚ ensure long-term durability․ These upgrades not only future-proof the swap but also provide a solid foundation for future modifications‚ making the LS engine a versatile choice for modern applications․
Case Studies and Real-World Applications
Real-world LS swap projects showcase successful implementations‚ highlighting lessons learned and practical solutions․ Enthusiasts share experiences‚ proving the feasibility and benefits of LS engine swaps in various vehicles;
Successful LS Swap Projects and Lessons Learned
Successful LS swap projects often highlight meticulous planning and attention to detail․ Many enthusiasts have shared their journeys‚ emphasizing the importance of proper wiring and ECU configuration․ For instance‚ a 1984 Chevy C10 with a 5․3L LS swap demonstrated how adapters can integrate the original dash gauges seamlessly․ Another project involved a 1997 Chevrolet with a 4․8L LS engine‚ where careful wire mapping and harness modification ensured smooth operation․ These case studies underscore the value of research‚ patience‚ and leveraging resources like wiring diagrams and tuning software to overcome challenges․ Each project serves as a testament to the versatility and power of LS engines in various applications․
Common Mistakes to Avoid
When undertaking an LS swap wiring project‚ several common mistakes can hinder success․ One of the most frequent errors is improper wire connections‚ leading to electrical malfunctions․ Many builders overlook the importance of proper grounding‚ which can cause erratic behavior in engine sensors and systems․ Additionally‚ insufficient research on wiring diagrams often results in misconnected components․ Another mistake is neglecting to address ECU communication issues‚ which can prevent the engine from running․ Finally‚ some enthusiasts skip testing individual circuits before powering up the entire system‚ leading to costly repairs․ Avoiding these pitfalls requires meticulous planning‚ thorough testing‚ and a deep understanding of the wiring process․

Maintenance and Upgrades Post-Swap
Regularly inspect wiring connections and upgrade components as needed to ensure long-term performance and reliability․ Plan for future modifications by designing a scalable electrical system․
Regular Maintenance for the Wiring System
Regular maintenance is crucial to ensure the longevity and reliability of your LS swap wiring system․ Start by inspecting all connections and wiring for signs of wear‚ damage‚ or corrosion․ Use a multimeter to test voltage drops and continuity‚ ensuring all circuits function as intended․ Clean or replace corroded connectors and tighten any loose terminals․ Pay special attention to high-current areas like the battery‚ alternator‚ and engine grounds․ Avoid overloading circuits with unnecessary accessories‚ as this can strain the system․ Schedule annual checks to identify and address potential issues before they escalate․ Proper upkeep will safeguard your investment and prevent unexpected failures down the road․
Upgrading Wiring for Future Modifications
Upgrading your wiring system during an LS swap sets the foundation for future modifications․ Consider installing high-quality‚ heavy-duty wires and connectors to handle increased power demands from potential upgrades like superchargers or high-performance alternators․ Adding optional circuits for auxiliary systems‚ such as aftermarket gauges or lighting‚ ensures flexibility․ Use weather-sealed connectors to protect against environmental elements․ Plan for future expandability by incorporating spare wiring harnesses or unused terminals; Additionally‚ integrating a modular wiring system allows for easier component swaps and reduces the risk of electrical conflicts․ Future-proofing your wiring now saves time and money when adding new components later‚ ensuring your setup remains efficient and scalable․
Completing an LS swap wiring project brings immense satisfaction․ Proper wiring ensures reliability and performance‚ setting you up for successful tuning and enjoying your enhanced vehicle․
Final Checklist for a Successful LS Swap
Before starting your LS swap‚ ensure all components are compatible and the wiring harness is properly modified․ Verify ECU communication‚ and test all connections to avoid issues․
Resources for Further Learning and Support
For further guidance‚ consult detailed LS swap wiring guides and diagrams available online․ Websites like wireblueprint․com offer comprehensive step-by-step instructions․ YouTube channels and forums provide hands-on tutorials and troubleshooting tips․ Additionally‚ tuning software like HP Tuners and resources from Summit Racing can aid in ECU configuration․ Join LS swap communities‚ such as LS1Tech or Facebook groups‚ for real-world advice and support․ Always refer to manufacturer specifications and consider professional assistance if needed․ These resources ensure a smooth and successful LS swap project․